Program Settings
The option ‘File\Settings\Program Settings’ will allow you to specify the maximum number of points for future jobs.
This directly affects the amount of memory allocated by the program for storage of points. This defines the maximum point
number you can use in the job, even if there are unused points ranges, no point number in the job can be larger than this number.
Important: The value you set will only be used the next time that you start the program.
Enlarging a Job
When you run out of points, do the following.
1. Save the job.
2. Set the Maximum Point Number to a higher value.
3. Stop the program
4. Re-start the program and open the job. You can now use up to the new maximum point number.
Memory
The system requires about 150 bytes of memory storage per point. The user can now set the Max Point Number value
to say 10,000 or 20,000 points for most common jobs.
If you have the number of points set too high on a PC with a small amount of memory, the program will start to
'‘page'’. This shows up to the user as long periods of waiting while the program works furiously on the hard disk
drive. If this happens, either buy more memory or reduce the number of points set for the job.
The following list shows the memory consumed by the whole program for various numbers of points.
PointsMemory
10,000 points = 3.8 Mb
20,000 points = 6.0 Mb
50,000 points = 8.3 Mb
100,000 points = 12.4 Mb
200,000 points = 23.5 Mb
If you have a machine with 1Gb of memory, you should set the maximum number of points to 100,000.
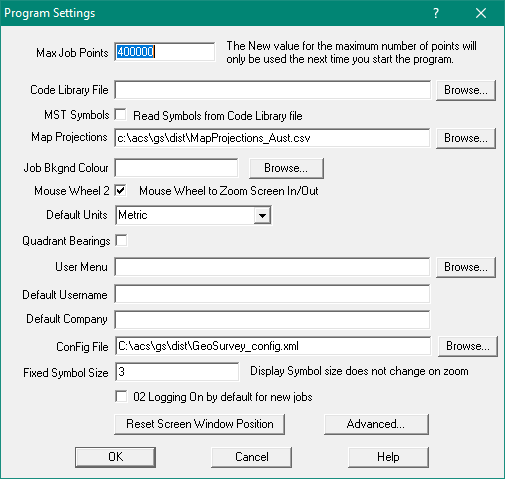
Code Library File
This is the default code/stringing file which will be used for forming Strings and Point symbolisation.
See Code Library - Form Strings by Code Library for more info.
MST Symbols
Untick this to read the symbols from the Config XML file.
Tick this to read the symbols from the Code Library File (can be an MST file)
Map Projections File
Enter the name of the file which contains the available Map projections and Datums. When you select a Datum/projection
for the job, this file will hold the avaliable Datum/projection list.
Select the Projection(Zone) which has been used for this job.
Click here to see the format of the MapProjections.csv file.
Job Background Colour
The Job Screen Background Colour option allows you to set the screen background colour to any colour the PC will allow.
Note that if you change it from the default colour (White) it may be hard to see some of the lines or text if it is
in a similar colour.
To get around this problem when you set the background colour to black, black lines and text are still considered ‘Black’
but are drawn on the screen in White. All other colours are left untouched. This black/white screen inversion is done
so you can see the job, which is usually mostly black lines and text. The lines and text are still drawn in black when
they are printed to a printer.
If the background colour has values of < 128 for Red, Green and Blue, the background will be considered ‘dark’ and
pure black lines will be drawn as white. Also the zoom in/out mouse cursors are displayed in white instead of black.
To see the colour RGB values for a background colour, press the ‘Define Custom Colours button and the RGB values (0-255 each)
are shown in the bottom right corner.
Mouse Wheel 2
Tick this box to make the mouse wheel zoom the screen in or out. If the box is not ticked, the mouse wheel will
scroll the screen up and down
Default Units
Note: This Units setting is only used when creating a new job. To set the units of the curent job,
see Job Settings
Metric settings influences
Distances are assumed to be in metres
Distances will be displayed in decimal metres
Areas are displayed in sq metres, Hectares or Sq Km
Geodetic Datum is assumed to be in metres
Projection units are metres
Bearings are entered and displayed as whole circle bearings
USA
Distances are assumed to be in decimal feet
Distances will be displayed in decimal feet
Areas are displayed in Acres, Roods and Perches
Geodetic Datum is defined in metres
Projection units (working units) are feet
Bearings are entered and displayed as whole circle bearings
Quadrant Bearings
Tick this box to allow entry of Quadrant bearings and display of bearings as Quadrant bearings.
User Defined Menu
Enter the filename for a User defined menu
Default Username
Enter the default username for New jobs
Default Company
Enter the default company name for New jobs
Config File
Enter the name of the configuration xml file. For more information click here
Fixed Symbol Size
Enter a symbol size to force a fixed screen display symbol size. Printouts and Exports will ignore this value.
If this field is blank the point symbols will be scaled according to the screen scale and job plot scale.
Reset Screen Window Position
If the screen display gets ‘lost’ off the screen, this button will reset the position onto the main screen display.
If this does not work – hold the SHIFT and CONTROL buttons when starting the program and the screen display position will be reset